

对spring有开发经验的同学,相信对spring aop并不陌生,而spring的事物就是使用aop实现的。aop的大多数的应用场景是日志记录,权限验证等。
最近笔者自己在项目中有个接口签名校验的功能,aop的功能正好能够实现此功能。但是在开发过程中,发现对此的使用比较模糊,特意查询资料,写下此文作为记录。
Advice通知类型介绍:
-
Before
前置通知,在目标方法执行之前做增强处理,@Before只需要指定切入点表达式即可。 -
Around
环绕通知,在目标方法完成前后做增强处理,Around环绕通知是最重要的通知类型,像事务,日志等都是环绕通知,注意编程中核心是一个ProceedingJoinPoint。 -
AfterReturning
后置通知,在目标方法正常完成后做增强,@AfterReturning除了指定切入点表达式后,还可以指定一个返回值形参名 returning ,代表目标方法的返回值。如果方法没有正常返回,或者抛出异常,不会执行 -
AfterThrowing
异常通知,主要用来处理程序中未处理的异常,@AfterThrowing除了指定切入点表达式后,还可以指定一个throwing的返回值形参名,可以通过该形参名来访问目标方法中所抛出的异常对象 -
After
最终通知,在目标方法完成之后做增强,无论目标方法是否成功完成。@After可以指定一个切入点表达式。
代码例子:
添加Pointcut和Advise
切面对象是使用了 @Sign 的方法,所以 @Pointcut() 中使用了注解的配置方式,关于 @Pointcut() 中的表达式配置,后文会单独讲解。
pointcut 的配置和通知都放在同一个类里面,所以 @Before、@Around...注解中配置的属性值是当前类中 pointcut 上的方法。
 @Slf4j
 public class TestAspect {

    /**
     * 切入点
     */
    @Pointcut("@annotation(xxx.Sign)")
    public void pointcut() {
    }

    /**
    * 前置通知
    */
    @Before("pointcut()")
    public void before(JoinPoint joinPoint) throws IOException {
        log.info("before...");
    }

    /**
    * 环绕通知
    */
    @Around("pointcut()")
    public Object around(ProceedingJoinPoint joinPoint) throws Throwable {
        log.info("around start...");
        Object result = joinPoint.proceed();
        log.info("around end...");
        return result;
    }

    /**
    * 后置通知
    */
    @AfterReturning("pointcut()")
    public void afterReturn(JoinPoint joinPoint) {
        log.info("afterReturn...");
    }

    /**
    * 异常通知
    */
    @AfterThrowing(value = "pointcut()", throwing = "throwable")
    public void afterThrowing(JoinPoint joinPoint, Throwable throwable) {
        log.info("afterThrowing");
        if (throwable instanceof BusinessException) {
            BusinessException e = (BusinessException) throwable;
            log.info("error msg:{}", e.getMessage());
        }
    }

    /**
    * 最终通知
    */
    @After("pointcut()")
    public void after() {
        log.info("after...");
    }
}
添加测试 TestController
controller定义了两个测试方法,test1()是测试正常返回的,test2()是测试异常抛出的。
@RestController
public class TestController {

    @Sign
    @RequestMapping("test1")
    public String test1() {
        log.info("test demo");
        return "SUCCESS";
    }

    @Sign
    @RequestMapping("test2")
    public String test2() {

        log.info("test demo");
        if (true) {
            throw new BusinessException(BaseResultEnum.FAILED);
        }
        return "SUCCESS";
    }
}
测试正常情况
请求 /test1 路径,输出的结果为:
around start...
before...
test demo
around end...
after...
afterReturn...
测试异常情况
请求 /test2 路径,输出的结果为:
around start...
before...
test demo
after...
afterThrowing
error msg: Fail
@AfterThrowing 还可以带上异常
小结
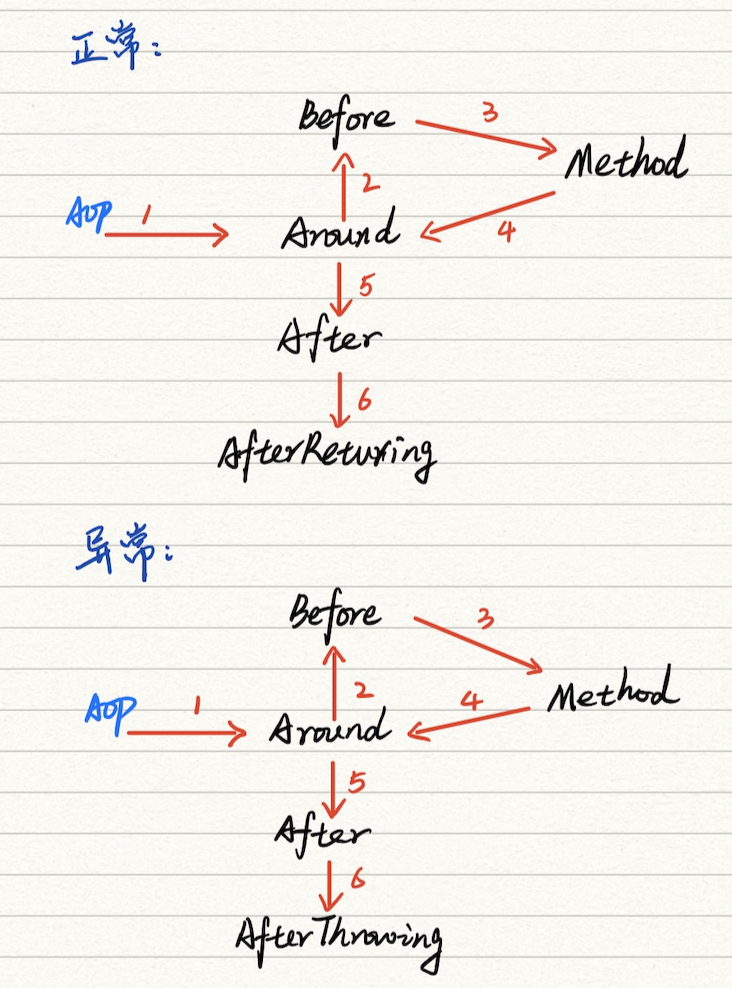
从上面的例子输出,我们可以看到正常情况与异常的执行顺序:
普通的改变,将改变普通
我是宅小年,一个在互联网低调前行的小青年
关注公众号「宅小年」,个人博客 📖 edisonz.cn,阅读更多分享文章
